AWS Elastic Beanstalk: How to Include an Additional Application Load Balancer
Somebody who likes to code
AWS Elastic Beanstalk is a fully managed service that allows developers to easily deploy, manage, and scale applications in the AWS cloud. One of the key components of Elastic Beanstalk is the Application Load Balancer, which ensures the efficient distribution of incoming traffic across multiple instances. In this article, we will examine how simple it is to incorporate an additional Application Load Balancer using .ebextensions. If you are new to this topic, you can refer to our previous article, Customizing Your AWS Elastic Beanstalk Environment with .ebextensions.
Why do we need two load balancers? Using both internal and internet-facing load balancers can be beneficial for applications that require secure internal communication while also serving external traffic. Internal load balancers distribute traffic among instances within a private network, while internet-facing load balancers handle traffic from the public internet. This setup can enhance security and provide better control over traffic routing.
We will begin with the code featured in the previous .ebextensions article, which can be downloaded here. Navigate to the Terraform folder and open the main.tf file. Locate the aws_elastic_beanstalk_environment resource and append the following lines at the end:
  setting {
      namespace = "aws:elasticbeanstalk:customoption"
      name      = "PrivateELBSubnets"
      value     = var.private_elb_subnets
  }

  setting {
      namespace = "aws:elasticbeanstalk:customoption"
      name      = "PrivateSSLCertificateArns"
      value     = var.private_ssl_certificate
  }
Open the variables.tf file and add the following:
variable "private_elb_subnets" {
  type = string
}

variable "private_ssl_certificate" {
  type = string
}
Navigate to the .ebextensions folder and create a file called add-load-balancer.config, then insert the following content:
Resources:
  AdditionalAWSEBLoadBalancerSecurityGroup:
    Properties:
      GroupDescription: Load Balancer Security Group
      VpcId:
        Fn::GetOptionSetting:
          Namespace: 'aws:ec2:vpc'
          OptionName: 'VPCId'
          DefaultValue: 'abc'
      SecurityGroupIngress:
        - CidrIp: 0.0.0.0/0
          FromPort: '80'
          ToPort: '80'
          IpProtocol: tcp
        - CidrIp: 0.0.0.0/0
          FromPort: '443'
          ToPort: '443'
          IpProtocol: tcp
      SecurityGroupEgress:
        - CidrIp: 0.0.0.0/0
          FromPort: '80'
          ToPort: '80'
          IpProtocol: tcp
    Type: 'AWS::EC2::SecurityGroup'
  AdditionalAWSEBV2LoadBalancer:
    Properties:
      SecurityGroups:
        - { "Ref" : "AdditionalAWSEBLoadBalancerSecurityGroup" }
      Subnets:
        Fn::Split:
          - ','
          - Fn::GetOptionSetting:
              Namespace: 'aws:elasticbeanstalk:customoption'
              OptionName: 'PublicELBSubnets'
              DefaultValue: 'abc'
      Scheme: internet-facing
    Type: 'AWS::ElasticLoadBalancingV2::LoadBalancer'
  AddtionalAWSEBV2LoadBalancerListener:
    Properties:
      LoadBalancerArn: { "Ref" : "AdditionalAWSEBV2LoadBalancer" }
      DefaultActions:
        - Type: redirect
          RedirectConfig:
            Path: '/#{path}'
            Query: '#{query}'
            Port: '443'
            Host: '#{host}'
            Protocol: HTTPS
            StatusCode: HTTP_301
      Port: 80
      Protocol: HTTP
    Type: 'AWS::ElasticLoadBalancingV2::Listener'
  AdditionalAWSEBV2LoadBalancerListener443:
    Properties:
      SslPolicy: ELBSecurityPolicy-2016-08
      LoadBalancerArn: { "Ref" : "AdditionalAWSEBV2LoadBalancer" }
      Port: '443'
      DefaultActions:
        - TargetGroupArn: { "Ref" : "AdditionalAWSEBV2LoadBalancerTargetGroup" }
          Type: forward
      Certificates:
        - CertificateArn:
            Fn::GetOptionSetting:
              Namespace: 'aws:elasticbeanstalk:customoption'
              OptionName: 'PublicSSLCertificateArns'
              DefaultValue: 'abc'
      Protocol: HTTPS
    Type: 'AWS::ElasticLoadBalancingV2::Listener'
  AdditionalAWSEBV2LoadBalancerTargetGroup:
    Properties:
      HealthCheckIntervalSeconds: 15
      VpcId:
        Fn::GetOptionSetting:
          Namespace: 'aws:ec2:vpc'
          OptionName: 'VPCId'
          DefaultValue: 'abc'
      HealthyThresholdCount: 3
      HealthCheckPath:
        Fn::GetOptionSetting:
          Namespace: 'aws:elasticbeanstalk:environment:process:default'
          OptionName: 'HealthCheckPath'
          DefaultValue: 'abc'
      Port: 80
      TargetGroupAttributes:
        - Value: '20'
          Key: deregistration_delay.timeout_seconds
      Protocol: HTTP
      UnhealthyThresholdCount: 5
      HealthCheckTimeoutSeconds: 5
    Type: 'AWS::ElasticLoadBalancingV2::TargetGroup'
  AWSEBAutoScalingGroup :
    Type: AWS::AutoScaling::AutoScalingGroup
    Properties:
      TargetGroupARNs:
        - { "Ref" : "AWSEBV2LoadBalancerTargetGroup" }
        - { "Ref" : "AdditionalAWSEBV2LoadBalancerTargetGroup" }
  AWSEBSecurityGroup:
    Properties:
      SecurityGroupIngress:
        - FromPort: '80'
          ToPort: '80'
          IpProtocol: tcp
          SourceSecurityGroupId: { "Ref" : "AWSEBLoadBalancerSecurityGroup" }
        - FromPort: '80'
          ToPort: '80'
          IpProtocol: tcp
          SourceSecurityGroupId: { "Ref" : "AdditionalAWSEBLoadBalancerSecurityGroup" }
    Type: 'AWS::EC2::SecurityGroup'
Let's discuss the resources created by the script (the default resources created by AWS Elastic Beanstalk can be located here):
AdditionalAWSEBLoadBalancerSecurityGroup: Security Group associated with the Load Balancer.AdditionalAWSEBV2LoadBalancer: The new internet-facing Load Balancer.AddtionalAWSEBV2LoadBalancerListener: The listener on port 80 with the default action to redirect to port 443.AdditionalAWSEBV2LoadBalancerListener443: The listener for the new Load Balancer on port 443.AdditionalAWSEBV2LoadBalancerTargetGroup: The new Load Balancer Target Group routes requests to one or more registered targets.AWSEBAutoScalingGroup: The Auto Scaling group attached to our environment.Now there are two Load Balancers attached, the new Target Group and the default one.
AWSEBSecurityGroup: The security group attached to our Auto Scaling group. We are allowing traffic from the new Security Group and the default one.
It's time to create the bundle for deployment. Execute the following commands:
dotnet publish ./src/WeatherApi/WeatherApi.csproj --output "terraform/publish/webapi" --configuration "Release" --framework "net6.0" /p:GenerateRuntimeConfigurationFiles=true --runtime win-x64 --no-self-contained
mkdir terraform/bundle
Compress-Archive -Path terraform/publish/webapi/* -DestinationPath terraform/bundle/site.zip
dotnet publish ./src/WeatherWs/WeatherWs.csproj --output "terraform/bundle/ws" --configuration "Release" --framework "net6.0" /p:GenerateRuntimeConfigurationFiles=true --runtime win-x64 --no-self-contained
copy .\install.ps1 .\terraform\bundle
copy .\aws-windows-deployment-manifest.json .\terraform\bundle
mkdir .\terraform\bundle\.ebextensions
copy .\.ebextensions\* .\terraform\bundle\.ebextensions
Compress-Archive -Path terraform/bundle/* -DestinationPath terraform/app.zip
Run the terraform scripts with the following commands:
cd terraform
terraform init
terraform plan -out app.tfplan -var="health_check_path=/swagger/index.html" -var="bucket=app-tf-001" -var="keypair=<MY_KEY_PAIR>" -var="instance_type=t2.medium" -var="application=app-tf-001" -var="vpc_id=<MY_VPC>" -var="ec2_subnets=<MY_SUBNETS>" -var="elb_subnets=<MY_SUBNETS>" -var="platform=64bit Windows Server 2019 v2.11.3 running IIS 10.0" -var ssl_certificate="<MY_SSL_CERTIFICATE>" -var="public_elb_subnets=<MY_SUBNETS>" -var public_ssl_certificate="<MY_SSL_CERTIFICATE>"
terraform apply 'app.tfplan'
And deploy the application version with the following command:
aws --region us-east-2 elasticbeanstalk update-environment --environment-name <OUTPUT_ENV_NAME> --version-label <OUTPUT_APP_VERSION>
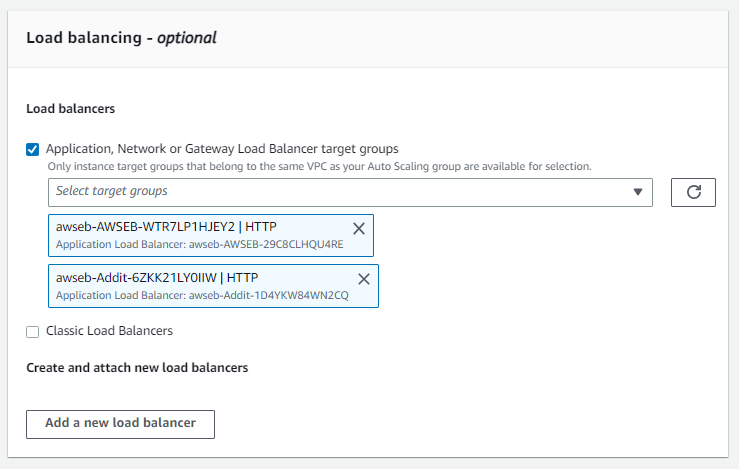
If we navigate to the Auto Scaling Group associated with the AWS Elastic Beanstalk application, we will now see two Load Balancers linked to it.
All the code is available here. Thanks, and happy coding.


