Collecting Metrics with CloudWatch Agent on AWS Elastic Beanstalk (Windows Server)
Somebody who likes to code
Monitoring our applications and infrastructure is crucial for maintaining optimal performance and ensuring the smooth operation of your systems. AWS Elastic Beanstalk (and EC2) provide a set of out-of-the-box metrics but, usually, is not enough to gain deeper insights into our application's performance. In this article, we will explore how to set up and use CloudWatch Agent on AWS Elastic Beanstalk running on Windows Server (using Terraform) to collect additional metrics to enhance our monitoring capabilities.
Every EC2 instance created by AWS Elastic Beanstalk comes with a CloudWatch Agent ($Env:ProgramFiles\Amazon\AmazonCloudWatchAgent on Windows) that we can easily configure to collect additional metrics. So, the remaining steps include:
Assign the appropriate IAM Policy(
CloudWatchAgentServerPolicy) to the EC2 instances. This will be achieved using our Terraform script. Refer to the following article for guidance, "How to Deploy a .NET App on AWS Elastic Beanstalk using Terraform (Windows Server)"Configure the new metrics to be sent to CloudWatch. We will utilize .ebextensions to achieve this task. If you are unfamiliar with .ebextensions, refer to the article "Customizing our AWS Elastic Beanstalk Environment with .ebextensions"
First, create a default .NET 6 API:
dotnet new webapi -n WeatherApi
dotnet new sln -n AwsCloudWatchAgent
dotnet sln add --in-root WeatherApi
Open the solution and ensure that the Program.cs file is as follows:
var builder = WebApplication.CreateBuilder(args);
builder.Services.AddControllers();
builder.Services.AddEndpointsApiExplorer();
builder.Services.AddSwaggerGen();
var app = builder.Build();
app.UseSwagger();
app.UseSwaggerUI();
app.UseAuthorization();
app.MapControllers();
app.Run();
Create a file named aws-windows-deployment-manifest.json at the solution level, containing the following content:
{
    "manifestVersion": 1,
    "deployments": {
        "aspNetCoreWeb": [
        {
            "name": "dotnet-api",
            "parameters": {
              "appBundle": "site.zip",
              "iisPath": "/",
              "iisWebSite": "Default Web Site"
            },
        }
        ]
    }
}
At the solution level, create a terraform folder containing a main.tf file with the following content:
terraform {
  required_providers {
    aws = {
        source = "hashicorp/aws"
        version = "4.22.0"
    }
  }
}

provider "aws"{
  region      = "us-east-2"
}

resource "aws_s3_bucket" "bucket" {
  bucket = "mybucket98563zsedaad"
}

resource "aws_s3_object" "bucket_object" {
  bucket = aws_s3_bucket.bucket.id
  key    = "app-${uuid()}.zip"
  source = "app.zip"
}

resource "aws_security_group" "security_group" {
  vpc_id       = "vpc-0c0df94516a75badc"
  name         = "mysecuritygroup"

  ingress {
    from_port   = 3389
    to_port     = 3389
    protocol    = "tcp"
    cidr_blocks = ["0.0.0.0/0"]
  }

  egress {
    from_port   = 0
    to_port     = 0
    protocol    = "-1"
    cidr_blocks = ["0.0.0.0/0"]
  }
}

data "aws_iam_policy_document" "assume_service_role" {
  statement {
    effect = "Allow"
    principals {
      type        = "Service"
      identifiers = ["elasticbeanstalk.amazonaws.com"]
    }
    actions = ["sts:AssumeRole"]
    condition {
        test     = "StringEquals"
        variable = "sts:ExternalId"
        values = [
        "elasticbeanstalk"
        ]
    }
  }
}

resource "aws_iam_role" "service_role" {
  name               = "myelasticbeanstalkservicerole"
  assume_role_policy = data.aws_iam_policy_document.assume_service_role.json
}

resource "aws_iam_role_policy_attachment" "AWSElasticBeanstalkEnhancedHealth-attach" {
  role       = aws_iam_role.service_role.name
  policy_arn = "arn:aws:iam::aws:policy/service-role/AWSElasticBeanstalkEnhancedHealth"
}

resource "aws_iam_role_policy_attachment" "AWSElasticBeanstalkManagedUpdatesCustomerRolePolicy-attach" {
  role       = aws_iam_role.service_role.name
  policy_arn = "arn:aws:iam::aws:policy/AWSElasticBeanstalkManagedUpdatesCustomerRolePolicy"
}

data "aws_iam_policy_document" "assume_role" {
  statement {
    effect = "Allow"
    principals {
      type        = "Service"
      identifiers = ["ec2.amazonaws.com"]
    }
    actions = ["sts:AssumeRole"]
  }
}

resource "aws_iam_role" "role" {
  name               = "myelasticbeanstalkec2role"
  assume_role_policy = data.aws_iam_policy_document.assume_role.json
}

resource "aws_iam_role_policy_attachment" "CloudWatchFullAccess-attach" {
  role       = aws_iam_role.role.name
  policy_arn = "arn:aws:iam::aws:policy/CloudWatchFullAccess"
}

resource "aws_iam_role_policy_attachment" "AWSElasticBeanstalkWebTier-attach" {
  role       = aws_iam_role.role.name
  policy_arn = "arn:aws:iam::aws:policy/AWSElasticBeanstalkWebTier"
}

resource "aws_iam_role_policy_attachment" "AWSElasticBeanstalkWorkerTier-attach" {
  role       = aws_iam_role.role.name
  policy_arn = "arn:aws:iam::aws:policy/AWSElasticBeanstalkWorkerTier"
}

resource "aws_iam_role_policy_attachment" "AWSElasticBeanstalkMulticontainerDocker-attach" {
  role       = aws_iam_role.role.name
  policy_arn = "arn:aws:iam::aws:policy/AWSElasticBeanstalkMulticontainerDocker"
}

resource "aws_iam_role_policy_attachment" "CloudWatchAgentServerPolicy-attach" {
  role       = aws_iam_role.role.name
  policy_arn = "arn:aws:iam::aws:policy/CloudWatchAgentServerPolicy"
}

resource "aws_iam_instance_profile" "instance_profile" {
  name = aws_iam_role.role.name
  role = aws_iam_role.role.name
}

resource "aws_elastic_beanstalk_application" "application" {
  name        = "myapplication"
}

resource "aws_elastic_beanstalk_environment" "environment" {
  name                = "myenvironment"
  application         = aws_elastic_beanstalk_application.application.name
  solution_stack_name = "64bit Windows Server 2019 v2.11.4 running IIS 10.0"
  tier                = "WebServer"

  setting {
    namespace = "aws:ec2:vpc"
    name      = "VPCId"
    value     = "<MY_VPC>"
  }

  setting {
    namespace = "aws:ec2:vpc"
    name      = "Subnets"
    value     = "<MY_SUBNETS>"
  }

  setting {
    namespace = "aws:ec2:vpc"
    name      = "ELBScheme"
    value     = "internet facing"
  }

  setting {
    namespace = "aws:ec2:vpc"
    name      = "ELBSubnets"
    value     = "<MY_SUBNETS>"
  }

  setting {
    namespace = "aws:autoscaling:launchconfiguration"
    name      = "IamInstanceProfile"
    value     = aws_iam_role.role.name
  }

  setting {
    namespace = "aws:autoscaling:launchconfiguration"
    name      = "SecurityGroups"
    value     =  aws_security_group.security_group.id
  }

  setting {
    namespace = "aws:autoscaling:launchconfiguration"
    name      = "InstanceType"
    value     = "t3.large"
  }

  setting {
    namespace = "aws:autoscaling:launchconfiguration"
    name      = "EC2KeyName"
    value     = "<MY_KEY_PAIR>"
  }

  setting {
    namespace = "aws:elasticbeanstalk:environment"
    name      = "LoadBalancerType"
    value     = "application"
  }

  setting {
    namespace = "aws:elasticbeanstalk:environment"
    name      = "ServiceRole"
    value     = aws_iam_role.service_role.name
  }

  setting {
      namespace = "aws:elasticbeanstalk:environment:process:default"
      name      = "HealthCheckPath"
      value     = "/swagger/index.html"
  }
}

resource "aws_elastic_beanstalk_application_version" "version" {
  bucket      = aws_s3_bucket.bucket.id
  key         = aws_s3_object.bucket_object.id
  application = aws_elastic_beanstalk_application.application.name
  name        = "myapplicationversion-${uuid()}"
}

output "app_version" {
  value = aws_elastic_beanstalk_application_version.version.name
}
output "env_name" {
  value = aws_elastic_beanstalk_environment.environment.name
}
Much of the script has been discussed in our previous articles. However, it's worth noting this new section where we assign the IAM Policy to the Role associated with our EC2 instances:
resource "aws_iam_role_policy_attachment" "CloudWatchAgentServerPolicy-attach" {
  role       = aws_iam_role.role.name
  policy_arn = "arn:aws:iam::aws:policy/CloudWatchAgentServerPolicy"
}
The next step is to create a .ebextensions folder at the solution level containing an install_cloudwatch_agent.config file with the following content:
files:
  "C:\\Program Files\\Amazon\\AmazonCloudWatchAgent\\config.json":
    content: |
      {
        "agent": {
          "metrics_collection_interval": 60
        },
        "metrics": {
          "append_dimensions": {
            "InstanceId": "${aws:InstanceId}"
          },
          "metrics_collected": {
            "Memory": {
              "measurement": [
                "Available Bytes"
              ]
            }
          }
        }
      }

container_commands:
  01_config_and_start:
    command: powershell.exe cd 'C:\Program Files\Amazon\AmazonCloudWatchAgent'; powershell.exe -ExecutionPolicy Bypass -File ./amazon-cloudwatch-agent-ctl.ps1 -a append-config -m ec2 -c file:config.json -s; powershell.exe -ExecutionPolicy Bypass -File ./amazon-cloudwatch-agent-ctl.ps1 -a start; exit
We are using two sections here:
files: This section is used to create files on the EC2 instance. In this specific scenario, we are creating the CloudWatch Agent configuration file.container_commands: This section is used to execute commands. Here, we are running PowerShell commands to apply the configuration and start the agent. Refer to this link for more information.
The basic structure of the configuration file has the following sections:
The
agentsection includes the following fields:metrics_collection_interval: Specifies how often all metrics specified in this configuration file are to be collected. The default value is 60 seconds.debug: Specifies whether to run the CloudWatch agent with debug log messages or not. This property is quite useful for troubleshooting; the default value isfalse.logfile: Specifies the location where the CloudWatch agent writes log messages. The default value on Windows isc:\\ProgramData\\Amazon\\CloudWatchAgent\\Logs\\amazon-cloudwatch-agent.log.
The
metricssection includes the following fields:namespace: The namespace to use for the metrics collected by the agent. The default value isCWAgent.append_dimensions: This property adds metric dimensions to all metrics collected by the agent. The supported key-value pairs include:"ImageID":"${aws:ImageId}""InstanceId":"${aws:InstanceId}""InstanceType":"${aws:InstanceType}""AutoScalingGroupName":"${aws:AutoScalingGroupName}"
aggregation_dimensions: Specifies the dimensions that collected metrics are to be aggregated on. For instance, specifying[["InstanceId"], ["InstanceType"], ["InstanceId", "InstanceType"]]aggregates metrics for instance ID singly, instance type singly, and for the combination of the two dimensions.metrics_collected: Specifies which metrics are to be collected. The content of this section varies depending on whether the configuration file is for a server running Linux or Windows. In this section, you can have an object for each Windows Performance counter. To view all available counters, run the commandGet-Counter -ListSet *. Under this object, we can include:measurement: Array of the counters to collect. Each item can either be the counter name or an object with the following properties:name: Specifies the counter name.rename: Specifies a different name to be used in CloudWatch.unit: Specifies the unit to use for this metric. Available units here.
resources: Array of instances to collect metrics from. we can also specify*forresourcesto collect separate metrics for every instance. We can determine whether a metric has an instance or not by using the command(Get-Counter -ListSet '<MY_METRIC_NAME>').PathsWithInstances.metrics_collection_interval: Specifies how often to collect the metrics for this object.append_dimensions: Specifies additional dimensions to use for only the metrics for this object.
The
logssection collects files and Windows events from the agent. Refer to this link for more information.
So we have everthing in place to create the application bundle to be deployed, run the following commands:
mkdir terraform/publish
mkdir terraform/bundle
dotnet publish ./WeatherApi/WeatherApi.csproj --output "terraform/publish" --configuration "Release" --framework "net6.0" /p:GenerateRuntimeConfigurationFiles=true --runtime win-x64 --no-self-contained
Compress-Archive -Path terraform/publish/* -DestinationPath terraform/bundle/site.zip
copy .\aws-windows-deployment-manifest.json .\terraform\bundle
mkdir .\terraform\bundle\.ebextensions
copy .\.ebextensions\* .\terraform\bundle\.ebextensions
Compress-Archive -Path terraform/bundle/* -DestinationPath terraform/app.zip
Run the following commands to create the environment, application, and application version on AWS Elastic Beanstalk:
cd terraform
terraform init
terraform plan -out app.tfplan
terraform apply 'app.tfplan'
And finally, the deployment of our application version itself:
aws --region us-east-2 elasticbeanstalk update-environment --environment-name <OUTPUT_ENV_NAME> --version-label <OUTPUT_APP_VERSION>
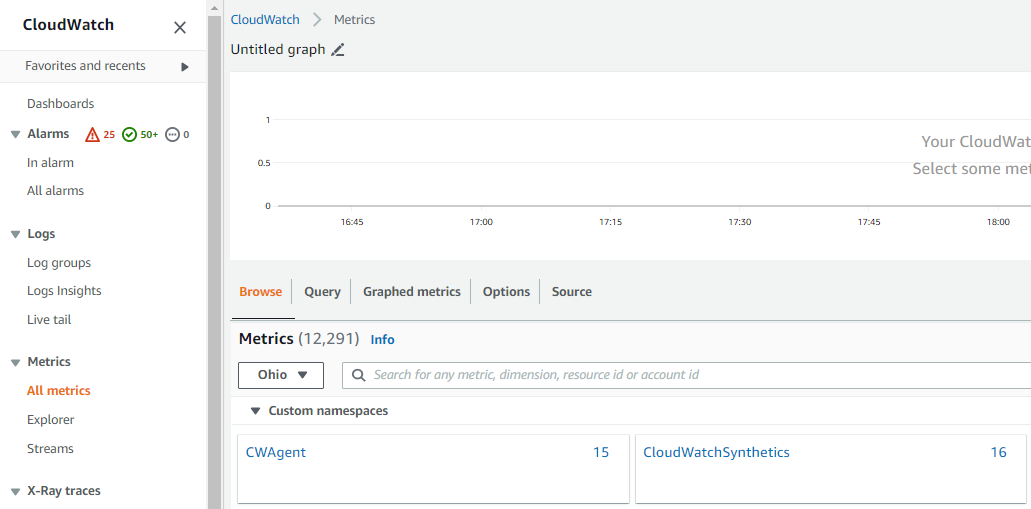
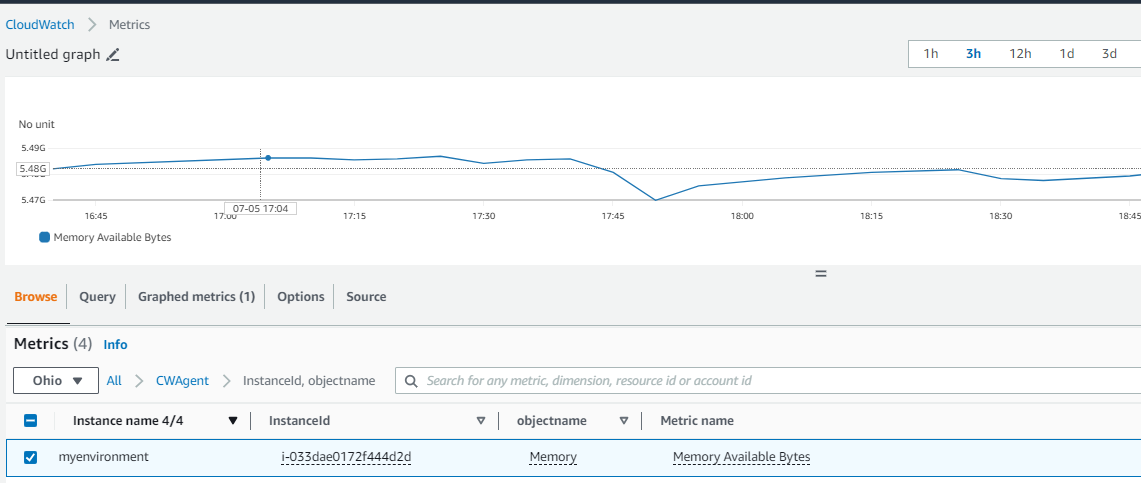
Once the deployment is complete, we can navigate to CloudWatch and see our:
In conclusion, setting up CloudWatch Agent on AWS Elastic Beanstalk running on Windows Server using Terraform allows you to collect additional metrics and enhance your monitoring capabilities. By leveraging .ebextensions and IAM policies, you can easily configure and deploy your application while gaining deeper insights into its performance. This enhanced monitoring will help you maintain optimal performance and ensure the smooth operation of your systems. You can see the code and scripts here. Thanks, and happy coding.


